Physical Address
304 North Cardinal St.
Dorchester Center, MA 02124
Physical Address
304 North Cardinal St.
Dorchester Center, MA 02124

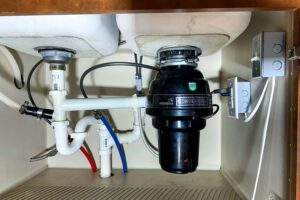
Installing a garbage disposal is a little more involved than replacing a faucet, but it is still a project that many homeowners can handle with the right tools and a little patience.
If you’re replacing an old disposal, the job is fairly straightforward as long as the new unit is compatible with your existing plumbing and electrical setup. If you’re installing one where there wasn’t a disposal before, the job can get considerably more complicated because you may need to modify the plumbing or electrical system.
I’m going to focus primarily on replacing an existing garbage disposal. I’ll also point out a few things you should check before buying a new one.
Before working on any electrical connection, make sure the power is turned off at the circuit breaker. If you aren’t comfortable working with household wiring, this is a good place to throw in the towel and call a plumber.
For the method I use, I typically gather:
I also recommend keeping a towel nearby. There is almost always some water left in the drain pipes, regardless of how carefully you disconnect them.
If you were happy with your last Garbage Disposal then I would recommend taking a picture of the name tag and buying the same exact one. When buying be sure to check that the horsepower of the old unit and new unit are the same to prevent electrical complications.
If you are planning on upgrading to a new and more powerful garbage disposal there are a few considerations that must be made. More powerful disposals can be physically larger, and some kitchen cabinets don’t leave much room underneath the sink. And secondly, a larger disposal may have a higher amp draw and may require a larger breaker to run. Check the manufactures recommendations, if the new disposal requires a larger breaker than what is currently installed in your breaker box you can do one of three things: replace your garbage disposal with one of the same amp draw; step up your breaker to a larger one, most likely 20 amp; or call an electrician/plumber to set up your garbage disposal for you.
A ⅓ or a ½ horsepower disposal is plenty powerful for the average home and chances are this is what you already have. Personally I would not deal with the headache of upgrading my garbage disposal past ½ horsepower.
You will have an additional choice between continuous-feed and batch-feed disposal.
A continuous-feed disposal turns on with a wall switch and can continue running while you add food waste. A batch-feed model requires a stopper or cover to be in place before it will operate.
If you’re replacing an existing disposal, I generally recommend buying something that matches the basic setup you already have unless you have a reason to change it.
Before doing anything underneath the sink, turn off the power to the garbage disposal at the circuit breaker.
Don’t rely on the wall switch alone, this is a mini chainsaw under your sink, be smart, be safe.
Once the breaker is off, I like to test the disposal switch to make sure the unit doesn’t turn on. This is a good practice with any electrical appliance.
If you have a voltage tester you can use that as well to be extra sure.
You can also shut off the water supply if your particular setup makes that necessary, but the important part is making sure the disposal has no electrical power.
Put a bucket underneath the drain connections before you start disconnecting anything.
There will probably be some dirty sink water sitting inside the trap and drain pipes, and the bucket gives that water somewhere to go besides the bottom of your cabinet.
Start by disconnecting the drain trap from the disposal’s discharge tube. If you have a dishwasher connected to the disposal, disconnect that hose as well.
Next, support the disposal from underneath.
Garbage disposals are heavier than they look, and the last thing you want is for one to come loose and fall while you’re underneath the sink. I usually put a stack of scrap wood underneath it to help support the weight while I work.
Once the disposal is supported, disconnect it from the mounting ring.
Depending on the configuration of the wiring, it may be possible to disconnect the wiring before unmounting the disposal. If this is an option I would highly recommend it so that you are not trying to balance the sink blender while trying to disconnect the wiring. If you cannot get to the wiring while the unit is installed that is ok too, you just may need an extra set of hands or more blocks to support the unit.
Before disconnecting the wiring take a note of the colors of the wires. If it is connected black to black, white to white, and green to green, then you should have a pretty easy time connecting your new unit. If the configuration or colors are any other combination and the unit worked previously you will want to make note and connect the new unit the same way.
If you’re replacing the sink flange as well, remove the old mounting hardware and take the flange out from the top of the sink.
If the flange is stuck, adjustable pliers can be used from underneath to help rotate it loose.
Always read the manufacturer’s instructions. They are smarter than either of us. Double check that the amp rating of the new unit will work with your existing kitchen breaker before installing it. If you don’t you will trip the kitchen breaker every time you turn your garbage disposal on.
Some disposals come with a power cord already installed while others need one added separately. If you need to install the cord, remove the electrical cover plate on the bottom of the disposal and connect the wires according to the manufacturer’s instructions.
You should have made note of how the old unit was connected. If the new unit has the same configuration then you have no issue. If it is different then you can use the wiring diagram on the old unit to figure out which of your home wires are hot, neutral, and ground without any tools.
I don’t recommend guessing when it comes to electrical wiring. If the wiring on your old disposal doesn’t match the instructions for the new one, stop and figure out why before connecting anything.
If you wire your garbage disposal incorrectly by switching the hot and neutral wires it will still run, but you may have problems down the line. If you are concerned you incorrectly wired the garbage disposal you can check our “Troubleshooting a Garbage Disposal” post.
Many replacement disposals come with a new sink drain flange, and I prefer installing the new flange rather than trying to reuse the old one. They are usually the first point of failure and are included in the kit anyway so its easier to just do it right the first time.
Start by rolling a rope of plumber’s putty about 3/8-inch thick. Too much putty can be cleaned off while too little putty will cause a leak that will need to be repaired, so be generous.
Press the putty around the underside of the flange, then insert the flange into the drain opening from above the sink.
Press it down evenly so the putty creates a seal.
From underneath the sink, install the backup ring, gasket, and mounting ring according to the disposal manufacturer’s instructions.
I tighten the mounting screws gradually and alternate between them. This pulls the mounting ring up evenly instead of tightening one side all the way before the other which can ruin your seal.
This is the part where having something to support the disposal becomes particularly useful.
Raise the disposal into position and attach it to the mounting ring.
Before tightening everything down, make sure the disposal outlet is facing the direction of the drain connection.
Turn the lower mounting ring clockwise until the disposal is supported, then use a screwdriver or disposal wrench to lock it into place.
Once it is mounted, give the unit a little shake to make sure it doesn’t wobble.
Now connect the disposal outlet to the existing drain pipe or P-trap.
Measure the discharge tube before cutting it. Not all garbage disposals are the same size, so don’t assume the old pipe will fit the new disposal without modification. A properly measured cut should be ready to install.
If you have a dishwasher connected to the disposal, this is also the time to connect the dishwasher discharge hose.
Important: If your disposal has a dishwasher inlet, make sure the plastic knockout plug has been removed before connecting the dishwasher hose. If you forget this step, the dishwasher won’t be able to drain through the disposal.
Before you consider the installation finished, check every plumbing connection. Run water into the sink and let it drain through the disposal. Then turn on the disposal and watch the connections underneath the sink.
I also like to plug the sink with the stopper, fill it with water, and let that water sit for a moment. This gives you a chance to check the drain flange for leaks that might not show up during normal operation.
If you see water anywhere, shut things down and tighten the appropriate connection.
You shouldn’t ignore small leaks. A slow leak underneath a kitchen sink can cause considerably more damage than the original plumbing problem.
There is no requirement that you do every part of this project yourself.
If you’re comfortable removing and mounting the disposal but aren’t comfortable making the electrical connections, an electrician or handyman can handle that portion.
Likewise, if the existing drain doesn’t line up with the new disposal or you need to modify the plumbing significantly, a plumber may be the better option.
I don’t consider calling a professional for one part of a project a failure. Sometimes it’s the most efficient way to finish the job without turning a simple replacement into a much larger repair.
The biggest thing I would emphasize is don’t underestimate how awkward a garbage disposal is to work with underneath a sink.
The disposal itself isn’t particularly complicated, but you’re usually working in a cramped cabinet while trying to hold a fairly heavy appliance above your head. Supporting the disposal while mounting it makes the job considerably easier.
I also recommend taking a picture of the old setup before disconnecting anything. It gives you something to reference when you’re trying to remember which drain pipe went where.
Keep a bucket underneath the plumbing while you disconnect it. There is almost always water in those pipes, and finding that out after it has emptied into your cabinet is not particularly fun.
When installing the flange, take your time getting the seal right. A disposal that works perfectly but leaks around the sink flange is still a bad installation.
I also don’t try to force the existing drain pipes to fit if the new disposal is a different size. Measure the discharge tube and make the necessary adjustment instead.
Finally, test everything before you put the tools away. Run water through the sink, operate the disposal, check the drain connections, and look underneath the sink for leaks.
My preferred method is to replace the flange along with the disposal, mount the new unit securely, make the drain connections carefully, and then test the entire system before considering the job finished.
A garbage disposal isn’t particularly complicated, but there are several places where rushing can create problems. Take your time with the electrical connections, mounting ring, and plumbing connections, and the actual installation is usually pretty straightforward.