Physical Address
304 North Cardinal St.
Dorchester Center, MA 02124
Physical Address
304 North Cardinal St.
Dorchester Center, MA 02124

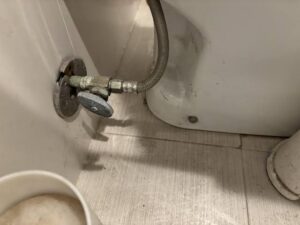
If the shutoff valve behind your toilet is leaking, won’t completely shut the water off, or has gotten old enough that you don’t trust it anymore, replacing it is usually a pretty straightforward plumbing repair.
The part that gets people into trouble is assuming every toilet shutoff valve comes off and goes back on the same way. They don’t.
The valve may be attached to the water pipe with a compression fitting, threads, solder, or a push-to-connect fitting. Before you start taking anything apart, figure out what you have.
In this guide, I’ll show you how I replace a toilet shutoff valve regardless of what style you already have.
Take a picture of the existing valve before removing anything.
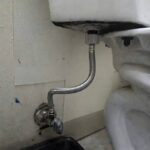
Look at where the water pipe comes out of the wall or floor and pay attention to how the valve connects to it.
A valve coming out of the wall will normally use an angle stop valve because the water needs to turn toward the toilet. A valve coming through the floor will generally use a straight stop.
Then look at the connection between the valve and the pipe. If you have a soldered connection or a compression fitting valve then I want you to buy a new valve with compression fittings.
If you have a valve that screws directly onto the threaded pipe then I want you to buy the same type of valve that is already installed.
If you are replacing the shutoff valve you obviously can’t rely on it to stop the flow of water.
You will have to secure the water supply further up the line. I do not know your exact plumbing layout, but if you have another shutoff valve for the specific bathroom you can close that. If you don’t know of any such valves you may have to shut-off the water supply to your entire house.
Your water main valve is most likely under a cover in your front yard of in your basement where the water line enters your home.
Secure your water supply then go back to your bathroom and start running the water in the sink to bleed off the water pressure and drain the line.
With your water supply secured, flush the toilet and hold the handle down until most of the water leaves the tank. You will want as little water left as possible.
Use a bucket or a storage tub to place below the shutoff valve. Slowly loosen the shutoff valve connection to the toilet water line and let it drain.
There will be some water left in the line.
This is why I keep a towel under plumbing connections even when I think I’ve drained everything. You can never get it all.
How you remove the valve depends on the connection.
A compression fitting will have a nut that is on the pipe that threads onto the valve body.
To get the compression fitting off you are going to hold the valve body with one wrench while turning the nut off. Once the threads are off you should be able to pull the valve body away.
Now you have the nut and the compression ring left on the pipe. Try pulling both off. If they won’t come off under reasonable tension then there are a couple things you can do.
if you have enough pipe sticking out of the wall you can cut the nut and sleeve off by cutting the actual pipe. Do not cut the pipe less than an inch from the wall or you may not be able to attach the new fitting.
If you don’t have enough pipe then you will have to cut the sleeve off very carefully. I prefer to use a triangle file to make a notch through the sleeve very slowly until it can be pried off. Be very careful not to leave any major cuts in the pipe as this will cause the new valve to leak.
If you have a compression sleeve or bearing puller you can also just use that.
If there are no threads anywhere in sight then you likely have a soldered connection. don’t worry it’s not as scary as it sounds, but you will need a blow torch to heat the connection.
First I want you to use aluminum foil to protect the wall before applying heat. This will save you from scorching the wall with the flame. Then simply apply heat to the connection while firmly pulling on the valve body with pliers. The solder will melt at a much lower temperature than the pipe and the valve body will pull away.
If you have a threaded connection then all you need to do is unscrew the valve body from the pipe.
The new valve needs a good surface to seal against.
If the pipe is badly pitted where the compression sleeve needs to seal, putting a brand-new valve on it doesn’t magically give you a new pipe. You can have the nicest shutoff valve in the hardware store and still have a leak.
If you’re installing a compression valve on copper, clean and deburr the pipe before installing the new valve. Take a piece of sandpaper or emery cloth and clean the pipe until the natural copper is bright and shiny.
Did you take the plate off of the pipe? It is called the escutcheon and you cannot put it on once the valve is installed.
If you have a threaded pipe, add some pipe thread to the pipe and simply screw your new valve onto the threaded pipe. make the connection tight but do not put your whole body weight into the wrench, you can shear the water pipe and then you will really be in trouble.
If you have a smooth pipe then you need to use a shut off valve with compression fittings.
Slide the steel nut over the copper pipe with the threaded end pointing away from the wall. then slide the brass compression sleeve over the pipe. Then I want you to push the valve body against the pipes end and thread on the steel nut by hand.
The compression sleeve will be caught in between the two. Use one wrench to hold the valve body and the other to tighten down the nut. The act of tightening these two together will compress the sleeve around the pipe sealing it from leaks.
Firmly snug up the connection but don’t go overboard, One of the benefits of the compression fitting is it can be tightened while water is in the pipe. So we will double check it later.
Attach the toilet supply line to the new shutoff valve.
If the existing supply line is kinked, corroded, damaged, or simply looks questionable, I would replace it while everything is already disconnected.
Hand-tighten the connection first, then snug it up with your tools if needed. If it is a plastic nut of plastic connection in general then it is most likely only designed to be hand tight, so keep that in mind.
All of these connections can be tightened if they leak a little bit so its not the end of the world.
Leave the shutoff valve closed for now.
I want you to open your main water supply as slowly as you possibly can. Introducing water pressure quickly to empty pipes can cause a “water hammer” affect that can literally explode your pipes, fittings, and fixtures.
So again open the main water supply as slowly as you can.
once the main water supply is open go back to your sink and try to run the faucet. You should see some air and probably some dirty water coming out of the faucet, that is ok. Wait until you see water again and you know that your pipes are bled of air.
Go take a look at your valve. It is likely that it is leaking from somewhere, this is ok.
If it is leaking from the compression fitting then slowly tighten down on it until the leak stops. If it is leaking from anywhere else do the same.
If you cannot get a leak to stop under reasonable force then it is likely that you have a damaged sealing surface or have forgotten a gasket somewhere.
If the old valve doesn’t work, it can’t protect you while you’re removing it.
The inlet connection and outlet connection both matter.
Take a picture of the old valve or bring it with you to the hardware store before buying the replacement.
Always hold the pipe or valve appropriately while loosening a fitting.
If the pipe starts moving inside the wall, stop.
That can turn a small valve replacement into a much larger plumbing repair.
If it leaks, tightening it a little more may solve the problem.
Continuing to tighten it until you feel like you’ve won a fight is not a repair technique.
If the braided line is damaged, rusty, kinked, or visibly deteriorated, replace it.
If there is a decorative plate around the pipe where it comes through the wall, remember that it may need to be moved before installing the new valve.
A damaged pipe can make a new valve leak.
Don’t assume the valve is the problem just because that’s the part you’re replacing.
I would stop and call a plumber if:
The toilet itself is usually the easy part.
The pipe disappearing into the wall is where I throw in the towel.