Physical Address
304 North Cardinal St.
Dorchester Center, MA 02124
Physical Address
304 North Cardinal St.
Dorchester Center, MA 02124

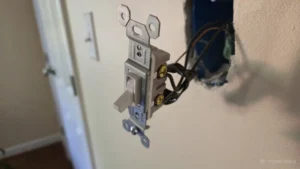
Replacing a standard light switch is a pretty simple repair. If the switch is cracked, loose, worn out, or just ugly, replacing it usually takes only a few minutes.
The important part is making sure the power is actually off before you start. Once that is taken care of, you’re basically removing the old switch and putting the new one in its place.
Here’s how I do it.
You don’t need many tools for this job. A voltage tester is nice to have but by no means necessary.
Turn the light on, then go to your electrical panel and turn off the breaker that controls it.
The light should go out.
If it does not then you have flipped the wrong breaker and need to try another.
Remove the wall plate and then remove the two screws holding the switch to the electrical box. Carefully pull the switch out far enough to expose the wiring.
Before you disconnect anything, take a picture of the existing switch especially if you have never done this before.
It takes two seconds.
For a typical mechanical light switch, you’ll usually have two insulated wires connected to the switch and a bare copper or green grounding wire connected to the green screw.
There may also be other wires in the electrical box that are not connected to the switch. Leave those alone. A neutral bundle, for example, may simply be connected together in the back of the box.
Also, don’t automatically assume that a white wire is a neutral. Older wiring can use a white conductor as part of the switched circuit. If the wiring doesn’t look like what you expected, don’t start moving wires around until you understand what you’re looking at.
In a typical light switch box, you’ll usually see a black or other colored wire, a white wire, and a bare copper or green wire.
The black wire is usually the hot wire, which brings power to the switch from the breaker. The other insulated wire carries power from the switch to the light, so I usually refer to it as switch hot.
The white wire is normally the neutral, which carries power back to the electrical panel, although older wiring can use a white wire as part of the switched circuit.
The bare copper or green wire is the ground, which provides a safe path for electrical current if something goes wrong.
Don’t rely on wire color alone if the wiring doesn’t look like you expect it to.
I prefer to move the wires one connection at a time.
Loosen the first terminal screw and remove the wire. Put that wire on the corresponding terminal of the new switch.
Then do the same thing with the second wire.
Finally, connect the bare copper or green grounding wire to the green grounding screw.
This is one of those jobs where there’s no advantage to removing everything at once. You already have a perfectly good wiring diagram sitting in front of you. There’s no reason to turn it into a puzzle.
If there is not enough wire or room to do it this way then you can also label the wires with tape. The labeling is not particularly important as long as you know where they go.
Some switches have holes in the back where the wires can be pushed in instead of being secured under the screws.
They can be used when the switch manufacturer allows it and the wire is the correct size and type. I generally prefer the screw terminals.
The connection is easier for me to inspect, and if someone has to replace the switch again later, it’s obvious how the wire is attached.
Once all of the wires are connected, carefully fold them back into the electrical box.
Don’t just shove everything in there.
Fold the wires so the switch can slide into the box without crushing the wires against the back or sides.
Start both mounting screws before tightening either one. Once the switch is sitting straight, tighten the screws enough to hold it securely.
The switch cover is cheap plastic, don’t put all of your might into it, it will break on you.
Install the wall plate and make sure it sits straight.
Go back to the electrical panel and turn the breaker back on.
Test the switch.
The light should turn on and off normally, and the switch should sit firmly against the wall.
Pay attention to anything unusual. The switch should not buzz, crackle, smell like something is getting cooked, or become unusually hot.
If something isn’t right, turn the breaker back off before doing anything else.
A normal switch replacement is one thing. Finding something unexpected in the electrical box is another.
Stop and have an electrician look at it if you find:
Don’t use the new switch to cover up an electrical problem.
If you can’t confidently identify where the wires go, stop guessing. Electricity is one of those things where “good enough” is not.
Take a picture and work one connection at a time. There’s no reason to make a simple repair harder than it needs to be.
Wire color is useful, but older wiring can be different. If the wiring doesn’t make sense, stop and figure it out.
Tighten the terminal screws securely, but don’t crush the wire or damage the switch.
If the old switch was unusually hot, buzzing, crackling, or showing signs of burning, don’t assume the switch itself is the only problem.
Make sure you’re buying a standard single-pole mechanical switch that matches the existing circuit and follow the instructions that come with the switch.
Take the picture before you disconnect anything. I know I already said this, but it’s worth repeating because it costs nothing and makes the job easier. I’ve never regretted taking a picture of wiring before taking it apart.
I prefer screw terminals. The push-in connections aren’t automatically bad, but I like being able to see exactly how the wire is secured. It also makes the next repair easier.
Don’t pull the switch farther out of the box than you need to. There’s usually no reason to have the wiring hanging out several inches into the room. Pull it out enough to work comfortably and leave the rest alone.
If the old switch looks burned, find out why. Replacing a burned switch without considering what caused it is like replacing a blown fuse with a bigger fuse and hoping for the best. The new switch may not be the actual problem.
And finally, don’t overcomplicate a simple repair. If you’ve got a normal switch, normal wiring, and a replacement switch that matches it, this is a quick job. If you open the box and find something that looks like it was wired during a completely different era of human civilization, that’s when I stop guessing and start looking for an electrician.