Physical Address
304 North Cardinal St.
Dorchester Center, MA 02124
Physical Address
304 North Cardinal St.
Dorchester Center, MA 02124

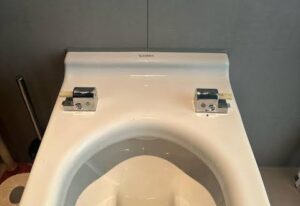
Changing a toilet seat is one of those jobs that looks more complicated than it actually is. The part that usually causes trouble isn’t putting the new seat on. It’s figuring out how the old one is attached, getting the new seat centered, and knowing when to stop tightening.
Most toilet seats are held on with two mounting points at the back of the bowl. Some use traditional bolts and nuts underneath the toilet, while others use hardware that installs entirely from above.
The first thing I do is figure out which type I have. From there, the job is pretty simple: remove the old seat, clean the mounting area, position the new one, and tighten the hardware.
Before removing anything, look at how the old seat is attached.
The two mounting arrangements you’ll run into most often are bottom-mount and top-mount seats.
A bottom-mount seat has bolts that pass through the toilet and nuts underneath. You tighten the bolt from above while holding the nut underneath.
This setup is simple enough. The only part that trips people up is the hard ware covers. When you look behind your toilet lid you probably see smooth raised bumps and not the actual hardware. Those covers that you see can usually just be flipped up from the back, underneath you will find the actual screws.
Top-mount seats are designed so the hardware can be installed and tightened from above the toilet.
These are useful when there isn’t enough room to reach the nuts underneath and some people just prefer the look. These are particularly common in Europe.
The hardware varies between different manufactures, but the general premise is the same. Something gets put into the hole, then the bolt screws into it causing it to expand and grip the toilet holding your seat tight.
Follow the instructions that came with the seat if the mounting system isn’t obvious.
Some seats have a release mechanism that lets you remove the seat from the mounting hardware without removing the hardware itself.
If you don’t see any hinges then this is likely the type that you have. Both Quick release and concealed seats are unusually top mounted. The only different is that they pop onto two studs that stick out instead of attaching with hinges on top of the toilet.
A quick release seat will have a push button likely on the bottom or the back of the seal and the back if the seat itself will be a bit thicker than normal.
If you cannot find a release button then it is likely that your seat can just be popped off of its mounts. The toilet seat should come off pretty easily. If you feel you are putting too much force into the seat then you should stop and make certain that there is not a release button of hinges somewhere.
Once you know what you’re dealing with, remove the old seat.
If plastic covers are hiding the mounting screws, open them.
If the seat has a quick-release mechanism, release the seat from the hinges.
For a bottom-mount seat, hold the nut underneath the toilet with a wrench or pliers while turning the bolt from above. The bolt and nut should be free to remove.
For a top-mount seat, remove the screws from above and pull out the mounting hardware. The plastic expansion nuts that are common with these are single use only so you will have to remove and replace them.
If the bolt just spins without coming loose the nut or anchor may be spinning along with it. You can either find a way to hold the anchor and take the bolt out, or you can pull it all out together, your call.
Once both mounting points are loose, lift the seat off the toilet.
Clean around the mounting holes while you have the seat off. You’ll probably find some grime hiding underneath the hinges that hasn’t seen daylight since the toilet was installed.
I also take a quick look at the porcelain around the mounting holes.
If the porcelain is cracked or damaged then unfortunately you will need a new toilet. These is not a reliable way to repair broken porcelain. I have seen people try to super-glue it back together but that is only ever a temporary fix.
Set the new seat on the bowl without fully tightening the hardware.
Move the seat until it is centered from side to side and the front of the seat lines up properly with the bowl.
Then close the seat and look at the gaps around the sides. This is your chance to get the seat how you want it. Once you’re happy with the position, install the mounting hardware loosely.
You want enough tension to hold the seat in position while still allowing you to make small adjustments.
Now tighten the hardware according to the type of seat you have.
For a traditional bottom-mount seat, put the new bolts through the hinges and the mounting holes in the toilet and install the new nuts underneath.
In your new toilet hardware there is usually some clips or plastic pieces that can slide into the hinges to help align the screws. Don’t forget those or your toilet seat will wobble.
I tighten each side a little at a time rather than completely tightening one side first. That makes it much easier to keep the seat centered. Once the seat is where you want it, give the hardware one more twist to snug it up.
For a top-mount seat, there should be two holes in the back of the toilet rim. You will have two anchors in your new hardware kit that will be inserted into the holes and the bolts will screw into.
depending on your toilet seat the hardware may be slightly different, but it will be some combination of the following. An anchor that goes in the toilet, bolts that go in the anchor, and either hinges that attach to the seat, or a mount for the hinges already attached to the seat.
When tightening the bolts remember that your are screwing into a plastic anchor. Do not over tighten or you will strip it out and have to start over.
Once everything is tight, close the seat and move it gently from side to side. Then sit on it normally.
The seat should stay centered and shouldn’t shift around on the bowl.
If the entire toilet moves when you sit down, that’s a different problem. Tightening the seat hardware isn’t going to fix a toilet that is loose against the floor.
→ [How to Fix a Wobbly Toilet]
If you’ve tightened the seat correctly and it keeps becoming loose, you can’t just tighten it harder every few days.
The hardware may be worn, the anchor may not be gripping properly, or the hinge itself may be damaged. Replacing the seat and its mounting hardware is often easier than repeatedly trying to tighten hardware that isn’t holding.
The biggest thing I would emphasize is don’t fully tighten the hardware until the seat is centered.
I’ve seen people tighten one side completely, realize the seat is crooked, and then loosening the hardware only to overwork and strip the hardware.
make small adjustments. A couple turns on one side, a couple on the other, then check the seat again.
The goal is to have a toilet seat that stays where it belongs with as little force as possible.